What is HTML?
HTML is a language for describing web pages.
- HTML stands for Hyper Text Markup Language
- HTML is a markup language
- A markup language is a set of markup tags
- The tags describe document content
- HTML documents contain HTML tags and plain text
- HTML documents are also called web pages
HTML Tags
HTML markup tags are usually called HTML tags
- HTML tags are keywords (tag names) surrounded by angle brackets like
- HTML tags normally come in pairs like and
- The first tag in a pair is the start tag, the second tag is the end tag
- The end tag is written like the start tag, with a forward slash before the tag name
- Start and end tags are also called opening tags and closing tags
Tags
The basic structure of an HTML document includes tags, which surround content and apply meaning to it.
Change your document so that it looks like this:
<html>
<body>
    This is my first web page
</body>
</html>
Now save the document again, go back to the web browser and reload the page.
The appearance of the page will not have changed at all, but the purpose of HTML is to apply meaning, not presentation, and this example has now defined some fundamental elements of a web page.
The first line on the top,
Closing tag
<html>
<body>
This is my first web page
</body>
</html>
Closing tag
Not all tags have closing tags like this (
Create a Basic HTML Template
While you have the Windows Explorer or Finder screen open, you can save your current HTML skeleton as a template. That way, you don’t have to type it all out every time you want a new web page.
In your text editor, delete any text between your two TITLE tags. Now click File > Save As. From the Save As dialogue box change the name of your web page to template.txt:
 Click Save to save the code as a text file. You will be returned to your text editor. Click File > Save Asagain. Now change the name of the file to newpage.html. In the Save As Type box in Windows, change it to All Files:
 Save the file and switch to Windows Explorer or Finder. You should now see three pages:
 One of these, the template is a text file rather than a HTML file. From now on, you can open the template text file, and repeat the process above: Click File > Save As, change the Save As Typebox to All Files, then type a new name for your web page, not forgetting the html ending.
There is a problem, however. If you were to double click your newpage.html file it would open up in your browser. But you will want to open it up in Notepad so that you can edit the file and make changes.
To solve the problem, you can add an item to the Send to menu in Windows (Macs will have an Open With right-click menu. Your text editor should be on there). This appears when your right-click the file:
 In the image above, we have Notepad on the Send to menu. Selecting this item means that we can quickly open up the code in Notepad.
To add an item to the Send to menu, switch back to your Explorer window. In the address bar at the top, enter the following:
%APPDATA%\Microsoft\Windows\SendTo
Press the Enter key on your keyboard and you will be taken to the Send to folder:
 You can now drag and drop items from your Start menu to this folder. (Make sure Windows Explorer doesn’t fill the whole of your screen by clicking the Restore Down icon just to the left of the Red X.)
Click your Windows Start button. From the All Programs > Accessories menu, locate Notepad again. Hold down your left mouse button on Notepad. Keep it held down and drag across to your Windows Explorer and your Send To folder:/
 Let go of your left mouse button and Notepad will be on your Send To menu when you right-click a file in Windows Explorer.
Now you can quickly open up your HTML code in Notepad and makes changes to it.
To recap this section, here are the important points again:
- The HTML skeleton is the foundation on which most internet pages are based
- HTML is written in Tags
- Tags usually come in pairs
- A Tag is a word surrounded by angle brackets, e.g.: , ,
- A pair of tags has as a starting Tag and an end Tag. The end Tag is preceded by a forward slash
- Add to the top of all your HTML pages.
In your text editor, delete any text between your two TITLE tags. Now click File > Save As. From the Save As dialogue box change the name of your web page to template.txt:
There is a problem, however. If you were to double click your newpage.html file it would open up in your browser. But you will want to open it up in Notepad so that you can edit the file and make changes.
To solve the problem, you can add an item to the Send to menu in Windows (Macs will have an Open With right-click menu. Your text editor should be on there). This appears when your right-click the file:
To add an item to the Send to menu, switch back to your Explorer window. In the address bar at the top, enter the following:
%APPDATA%\Microsoft\Windows\SendTo
Press the Enter key on your keyboard and you will be taken to the Send to folder:Click your Windows Start button. From the All Programs > Accessories menu, locate Notepad again. Hold down your left mouse button on Notepad. Keep it held down and drag across to your Windows Explorer and your Send To folder:/
Now you can quickly open up your HTML code in Notepad and makes changes to it.
To recap this section, here are the important points again:
- The HTML skeleton is the foundation on which most internet pages are based
- HTML is written in Tags
- Tags usually come in pairs
- A Tag is a word surrounded by angle brackets, e.g.: , ,
- A pair of tags has as a starting Tag and an end Tag. The end Tag is preceded by a forward slash
- Add to the top of all your HTML pages.
Basic HTML - Heading Tag
You can have a nice big heading on your web page quite easily. This is done with the H tags. The biggest size heading you can have is H1. If you want smaller sized headings then you change the number after the H. You can have up to 6 different sizes. All headings need to go between the two BODY tags.
Try it out for yourself. Open up the code for your firstwebpage.html file, if it’s not already open. (If it’s not, you can now right-click and Send To > Notepad. If you didn’t get this working then simply clickFile > Open from the menu at the top of your text editor.)
Add the following just below your first BODY tag:
A Size 1 Heading
Incidentally, tags are not case sensitive. So you can have this:Add the following just below your first BODY tag:
A Size 1 Heading
A Size 1 Heading
A Size 1 Heading
Once you’ve added the H1 tags, though, your HTML should look like this:


A Size 3 Heading
Save the changes. Go back to your browser and press F5 to refresh the page. You should see this:
Exercise
Try the other H numbers to see how they compare. You can only go as far as H6.
Paragraph and BR breaks
 If you've ever used a word processor like Microsoft Word then you know that to start a new paragraph all you need to do is to hit the Enter key on your keyboard. The cursor will then move down, ready for you to start typing. In HTML, however, you can't do this. If you want to start a new paragraph, you have to use the P tags.
To try it out, add the following just below your Heading (You can use your own text, though, rather than type out the Hamlet soliloquy):
To be, or not to be: that is the question: Whether 'tis nobler in the mind to suffer the slings and arrows of outrageous fortune, or to take arms against a sea of troubles, and by opposing end them?
To die: to sleep; no more; and by a sleep to say we end the heart-ache and the thousand natural shocks that flesh is heir to, 'tis a consummation devoutly to be wish'd.
When you’ve finished, your HTML code should look like this: (Don’t worry about the indenting, though. We did ours just so it would look nice in this book. Only one press of the spacebar is recognised in HTML, everything else is ignored, including indents and carriage returns.)
 Note the P tags:
You have to use the P tags whenever you want to start a new paragraph.
Strictly speaking, though, you don’t need the closing P tag. You can just do this to start a new paragraph:
To be, or not to be: that is the question: Whether 'tis nobler in the mind to suffer the slings and arrows of outrageous fortune, or to take arms against a sea of troubles, and by opposing end them?
To die: to sleep; no more; and by a sleep to say we end the heart-ache and the thousand natural shocks that flesh is heir to, 'tis a consummation devoutly to be wish'd.
The result is the same. But in modern web coding, it’s best to use the closing tag for paragraphs, so that you can add Styling rules. (You’ll learn how to do this a little later.)
Save your work and view the results in your browser. You should see this:
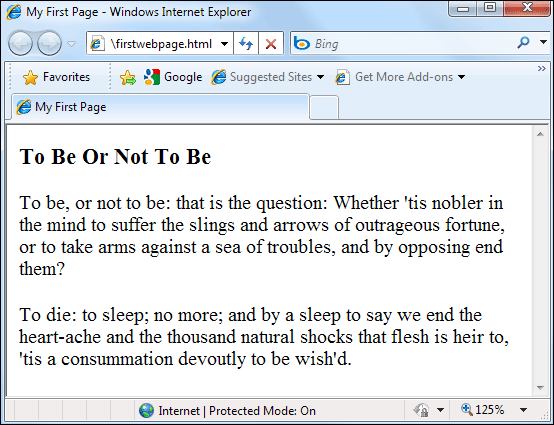 Notice the paragraphs breaks in the text. Notice, too, that although our code was indented, this doesn’t show up in the browser. The browser will ignore all those indents we had, and any extra white space. If you want white space you have “tell” the browser. You do this with the break tags, like P and BR (which you’ll see soon).
As an exercise, try deleting the P tags in your code. Save and refresh your browser. Watch what happens:
 Without the P tags the text just runs on.
There is still, however, a paragraph break after the heading, even though we deleted all the P tags. This is because the H heading tags insert their own paragraph breaks.
To be, or not to be: that is the question: Whether 'tis nobler in the mind to suffer the slings and arrows of outrageous fortune, or to take arms against a sea of troubles, and by opposing end them?
To die: to sleep; no more; and by a sleep to say we end the heart-ache and the thousand natural shocks that flesh is heir to, 'tis a consummation devoutly to be wish'd.
When you’ve finished, your HTML code should look like this: (Don’t worry about the indenting, though. We did ours just so it would look nice in this book. Only one press of the spacebar is recognised in HTML, everything else is ignored, including indents and carriage returns.)Strictly speaking, though, you don’t need the closing P tag. You can just do this to start a new paragraph:
To be, or not to be: that is the question: Whether 'tis nobler in the mind to suffer the slings and arrows of outrageous fortune, or to take arms against a sea of troubles, and by opposing end them?
To die: to sleep; no more; and by a sleep to say we end the heart-ache and the thousand natural shocks that flesh is heir to, 'tis a consummation devoutly to be wish'd.
Save your work and view the results in your browser. You should see this:
As an exercise, try deleting the P tags in your code. Save and refresh your browser. Watch what happens:
There is still, however, a paragraph break after the heading, even though we deleted all the P tags. This is because the H heading tags insert their own paragraph breaks.
The BR tagThe BR tag is used when you don’t want a full paragraph break. The space between lines of text is then reduced. The BR tag doesn’t need a closing tag, and can be just by itself.As an example, add the following to the end of your text (the BR part).To die: to sleep; no more; and by a sleep to say we end the heart-ache and the thousand natural shocks that flesh is heir to, 'tis a consummation devoutly to be wish'd.... Rest of Hamlet's Soliloquy goes here
Notice that we've deleted the end P tag for the second paragraph. If you leave it in, you'll get a double line break from the two tags, as well as a single line break from thetag.
Save your changes and switch to your browser. Press F5 to refresh the page and the results should look like this:

HTML Marquee
A HTML marquee is a scrolling piece of text displayed either horizontally across or vertically down your web site page depending on the settings. This is created by using HTML tag .
NOTE: The HTML
A HTML marquee is a scrolling piece of text displayed either horizontally across or vertically down your web site page depending on the settings. This is created by using HTML tag .
NOTE: The HTML
Syntax:
A simple syntax to use marquee is as follows:
Attributes:
A HTML marquee can have following attributes:
- width: how wide the marquee is. This will have a value like 10 or 20%etc.
- height: how tall the marquee is. This will have a value like 10 or 20% etc.
- direction: which direction the marquee should scroll. This will have value either up, down,left or right.
- behavior: what type of scrolling. This will have value scroll, slid and alternate.
- scrolldelay: how long to delay between each jump. This will have a value like 10 etc.
- scrollamount: how far to jump. This will have a value like 10 etc.
- loop: how many times to loop. The default value is INFINITE, which means that the marquee loops endlessly.
- bgcolor: background color. This will have any color name or color hex value.
- hspace: horizontal space around the marquee. This will have a value like 10 or 20%etc.
- vspace: vertical space around the marquee. This will have a value like 10 or 20%etc.
Examples:
Here are few examples to demonstrate the usage of marquee tag.
This will produce following result:
This will produce following result:
This will produce following result:
This will produce following result:
Here are few examples to demonstrate the usage of marquee tag.
This will produce following result:
This will produce following result:
This will produce following result:
This will produce following result:
Bold and Italics
Two more tags that come in useful are the Bold and Italic tags. They are quite easy to use. Here are the Bold tags:
And here are the Italic tags:
The text you want to change goes between the two tags:
... Rest of Hamlet's Soliloquy goes here
... Rest of Hamlet's Soliloquy goes here
If you want Bold and Italic text then you can nest the two:
Two more tags that come in useful are the Bold and Italic tags. They are quite easy to use. Here are the Bold tags:
And here are the Italic tags:
The text you want to change goes between the two tags:
... Rest of Hamlet's Soliloquy goes here
... Rest of Hamlet's Soliloquy goes here
... Rest of Hamlet's Soliloquy goes here
The two I tags go between the two B tags. You can have it the other way around, though, with the I tags first:
... Rest of Hamlet's Soliloquy goes here
Be careful of this, however:
... Rest of Hamlet's Soliloquy goes here
This is a mismatched pair of tags. The two tags on the inside are B and I, and the ones on the outside are I and B. A modern browser will probably correct the mismatch, but older ones may not.Try it in your HTML code:


... my name is xyz
You can nest all three tags: bold, italics, and underline:
... my name is xyz
All this nested HTML code can be a bit messy, however. The modern solution is to use something called a Cascading Stylesheet. Using a Stylesheet allows you to do all your text formatting in the HEAD section, or better yet in an external file.HTML Lists
You can insert a bulleted list onto your page with HTML. There are two types of lists to choose from: Ordered List and Unordered. An Ordered list is one that uses number, letters, roman numerals, or a combination. Like this:
 An Unordered List is one that uses bullets. Like this:
 To get a list with numbers or letters, this tag is used:
The OL stands for Ordered List, of course. But those two tags won’t get you a list. You need to include another tag, the LI tag. LI stands for List Item. You need one pair of LI tags for every item in your list. So for three items, the code is this:
To get the bulleted list, the UL tag is used. UL stands for Unordered List. It’s used in exactly the same way. Just substitute the OL tags for UL tags.
For both the Ordered and Unordered list, you can specify which type you want to use for the bullets or numbers. The types are these:


There are three types of bullets you can use for unordered lists: Disc, Circle, and Square. You use them like this:


HTML Hyperlinks (Links)
The HTML tag defines a hyperlink.
A hyperlink (or link) is a word, group of words, or image that you can click on to jump to another document.
When you move the cursor over a link in a Web page, the arrow will turn into a little hand.
The most important attribute of the element is the href attribute, which indicates the link’s destination.
By default, links will appear as follows in all browsers:
- An unvisited link is underlined and blue
- A visited link is underlined and purple
- An active link is underlined and red
HTML Link Syntax
The HTML code for a link is simple. It looks like this:
The href attribute specifies the destination of a link.
Example
which will display like this: visit technologies
Clicking on this hyperlink will send the user to W3Schools' homepage.
Tip: The "Link text" doesn't have to be text. It can be an image or any other HTML element.
HTML Links - The target Attribute
The target attribute specifies where to open the linked document.
The example below will open the linked document in a new browser window or a new tab:
HTML Links - The id Attribute
The id attribute can be used to create a bookmark inside an HTML document.
Tip: Bookmarks are not displayed in any special way. They are invisible to the reader.
Example
An anchor with an id inside an HTML document:
Useful Tips Section
Create a link to the "Useful Tips Section" inside the same document:
Visit the Useful Tips Section
Or, create a link to the "Useful Tips Section" from another page:
Visit the Useful Tips Section
Basic Notes - Useful Tips
Note: Always add a trailing slash to subfolder references. If you link like this: href="http://learningfinest.blogspot.com/p/learn-html.html", you will generate two requests to the server, the server will first add a slash to the address, and then create a new request like this: href="http://http://learningfinest.blogspot.com/p/learn-html.html".
The HTML head element acts as container for global information about the document. In this section, authors can set: the title, a description, a group of related keywords for the page, relational information between this document and another, etc. Except for the title, all this
The HTML head element must be placed at the top of the document, inside the html element information is not considered part of the document's content, and therefore not rendered.but before the HTML body element.
Attributes:
lang (langcode)
lang (langcode)
Specifies the language of an element's content. The default value is "unknown".
When writing XHTML 1.0 documents, the attribute used to specify the language of an elements is "xml:lang". For forward and backward compatibility both attributes can be used simultaneously as in the example below. Note that in XHTML 1.1 the "lang" attribute has been completely replaced by "xml:lang" and its use is no longer valid.
When writing XHTML 1.0 documents, the attribute used to specify the language of an elements is "xml:lang". For forward and backward compatibility both attributes can be used simultaneously as in the example below. Note that in XHTML 1.1 the "lang" attribute has been completely replaced by "xml:lang" and its use is no longer valid.
This is a paragraph in English.
Este es un párrafo en español.
dir
This attribute indicates the direction in which the texts of the element must be read. This includes content, attribute values and tables. It has two possible values that are case-insensitive:
- RTL: Right to left.
- LTR: Left to right.
...an Hebrew quotation..\profile (uri)
Points to a document containing metadata profile. This information is used to establish a set of properties that may be used by the HTML meta tag and the HTML link tag.
HTML Image Links

This will create following hyperlink at MyTopTutorials.com home.
 |
This was the simpletest way of creating hyperlinks using images. Next we will see how we can create Mouse-Sensitive Image Links.
Mouse-Sensitive Images:
The HTML and XHTML standards provide a feature that lets you embed many different links inside the same image. Clicking different areas of the image causes the browser to link to different target documents. Such mouse-sensitive images known as image maps.
There are two ways to create image maps:
- A server-side image maps: is enabled by the ismap attribute for the
tag and requires access to a server and related image-map processing applications.
- A client-side image maps: is created with the usemap attribute for the
tag, along with corresponding
Server-Side Image Maps:
You add an image to an anchor simply by placing an ![]() tag within the body of the tag. Make that embedded image into a mouse-sensitive one by adding the ismap attribute to the
tag within the body of the tag. Make that embedded image into a mouse-sensitive one by adding the ismap attribute to the ![]() tag. This special
tag. This special ![]() attribute tells the browser that the image is a special map containing more than one link.
attribute tells the browser that the image is a special map containing more than one link.
When the user clicks some place within the image, the browser passes the coordinates of the mouse pointer along with the URL specified in the tag to the document server. The server uses the mouse-pointer coordinates to determine which document to deliver back to the browser.
When ismap is used, the href attribute of the containing tag must contain the URL of a server application like amap file or cgi script etc. to process the incoming request based on the passed coordinates.
The coordinates of the mouse position are screen pixels counted from the upper-left corner of the image, beginning with (0,0). The coordinates, preceded by a question mark, are added to the end of the URL.
For example, if a user clicks 50 pixels over and 30 pixels down from the upper-left corner of the image displayed from the following link:
 |
Then the browser sends the following search parameters to the HTTP server which can be processed by cgi script or map file and you can link whatever you like to these coordinates:
/cgi-bin/logo.map?50,30 |
NOTE: Converting the coordinates into a specific document is handled by the server side application, either cgi programme or special map files provided by web server. For more detail Check Using HTML ismap.
Client-Side Image Maps:
Client side image maps are enabled by the usemap attribute for the ![]() tag and defined by special
tag and defined by special
The image that is going to form the map is inserted into the page using the ![]() element as normal, except it carries an extra attribute called usemap. The value of the usemap attribute is the value of the name attribute on the
element as normal, except it carries an extra attribute called usemap. The value of the usemap attribute is the value of the name attribute on the
The
The element specifies the shape and the coordinates that define the boundaries of each clickable hotspot. Here's an example from the image map:
<!– Create Mappings –>
coords="154,150,59" href="link1.htm" alt="link 1"
target="_self" />
coords="272,79,351,79,351,15,486,15,486,218,272,218, 292,166,292,136,270,76" alt="link 2"
href="link2.htm" target="_self" />
coords="325,224,488,286" alt="link 3"
href="link3.htm" target="_self" />
|
The actual value of coords is totally dependent on the shape in question. Here is a summary, to be followed by detailed examples:
- rect = x1 , y1 , x2 , y2
- x1 and y1 are the coordinates of the upper left corner of the rectangle; x2 and y2 are the coordinates of the lower right corner. Therefore, a rectangle which goes from 10,5 to 20,25 would have the attribute coords="10,5,20,25". A rectangle which defines the upper-left quarter of an image might use coords="0,0,50%,50%".
- circle = xc , yc , radius
- xc and yc are the coordinates of the center of the circle, and radius is the circle's radius. A circle centered at 200,50 with a radius of 25 would have the attribute coords="200,50,25"; one centered at the image's center and having a diameter of half the image would be defined bycoords="50%,50%,25%".
- poly = x1 , y1 , x2 , y2 , x3 , y3 , … xn , yn
- The various x-y pairs define vertices (points) of the polygon, with a "line" being drawn from one point to the next point. A diamond-shaped polygon with its top point at 20,20 and 40 pixels across at its widest points would have the attribute coords="20,20,40,40,20,60,0,40". A "line" is always drawn from the coordinates of the last point to the coordinates of the first point in order to close the polygon.
All coordinates are relative to the upper-left corner of the image (0,0). Each shape has a related URL.You can use any image software to know the coordinates of different positions.
HTML Email Links
This is very easy to put an HTML email link on your page. But while doing so, you need to put your email address on your web page which can cause a spamming problem for your email account. There are many guys over the internet who can run programs to harvest these types of emails for spamming. So if you are going to put your email link on a public website then you have be prepared for anti-spamming as well.
You can have another option to facilitate people to send you emails. This option is to use HTML forms to take user data and then use CGI script to send an email.
A simple example, check our Contact Us Form. We take user feedback using this form and then we are using one CGI program which is collecting this information and sending email to one given email ID.
HTML Email Tag:
HTML tag provides you facility to specifiy an email address to send an email. While using tag as an email tag then you will use mailto:email address along with href attribute. Following is the syntax of using mailto instead of using http.
| Send Email |
This code will generate following link:
| Send Email |
Now if a user will click this link then it will lanuch one Email Client ( like Lotus Notes, Outlook Express etc. ) installed on your user's computer.
This is another risk to use this procedure because if users do not have email client installed on their computer then it would not be possible to send you email.
Default Email Subject and Body:
You can specify a default email subject and email body alongwith your email address. Following is the example to use default subject and body.
| Send Feedback |
This code will generate following link:
| Send Feedback |
HTML Tables
Tables are very useful to arrange in HTML and they are used very frequently by almost all web developers. Tables are just like spreadsheets and they are made up of rows and columns.
You will create a table in HTML/XHTML by using
tag. Inside
element the table is written out row by row. A row is contained inside a tag . which stands for table row. And each cell is then written inside the row element using a
tag. Inside
| tag . which stands for table data. |
Example:
|
This will produce following result:
|
NOTE: In the above example border is an attribute of
and it will put border across all the cells. If you do not need a border then you cal use border="0". The border attribute and other attributes also mentione din this session are deprecated and they have been replaced by CSS. So it is recommended to use CSS instead of using any attribute directly.
and it will put border across all the cells. If you do not need a border then you cal use border="0". The border attribute and other attributes also mentione din this session are deprecated and they have been replaced by CSS. So it is recommended to use CSS instead of using any attribute directly.
To Become more comfortable – Do Online Practice
Table Heading – The Element:
Table heading can be defined using
element. This tag will be put to replace
tag which is used to represent actual data. Normally you will put your top row as table heading as shown below, otherwise you can use
element at any place:
element. This tag will be put to replace
tag which is used to represent actual data. Normally you will put your top row as table heading as shown below, otherwise you can use
element at any place:
|
This will produce following result. You can see its making heading as a bold one:
|
To Become more comfortable – Do Online Practice
NOTE: Each cell must, however, have either a or a element in order for the table to display correctly even if that element is empty.
Table Cellpadding and Cellspacing:
There are two attribiutes called cellpadding and cellspacing which you will use to adjust the white space in your table cell. Cellspacing defines the width of the border, while cellpadding represents the distance between cell borders and the content within. Following is the example:
|
This will produce following result:
|
Colspan and Rowspan Attributes:
You will use colspan attribute if you want to merge two or more columns into a single column. Similar way you will use rowspan if you want to merge two or more rows. Following is the example:
| |||||||||||
This will produce following result:
| |||||||||||
Tables Backgrounds
You can set table background using of the following two ways:
- Using bgcolor attribute – You can set background color for whole table or just for one cell.
- Using background attribute – You can set background image for whole table or just for one cell.
NOTE:You can set border color also using bordercolor attribute.
Here is an example of using bgcolor attribute:
|
Row 1 Cell 1
Row 1 Cell 2
Row 1 Cell 3
Row 2 Cell 2
Row 2 Cell 3
Row 3 Cell 1
This will produce following result:
| |||||||||||
To Become more comfortable – Do Online Practice
Here is an example of using background attribute:
| |||||||||||
This will produce following result:
| Column 1 | Column 2 | Column 3 |
|---|---|---|
| Row 1 Cell 1 | Row 1 Cell 2 | Row 1 Cell 3 |
| Row 2 Cell 2 | Row 2 Cell 3 | |
| Row 3 Cell 1 | ||
Table height and width:
You can set a table width and height using width and height attrubutes. You can specify table width or height in terms of integer value or in terms of percentage of available screen area. Following is the example:
|
This will produce following result:
|
Using Table Caption:
The caption tags will serve as a title or explanation and show up at the top of the table. This tag is depracated in newer version of HTML/XHTML.
|
This will produce following result:
|
Using a Header, Body, and Footer:
Tables can be divided into three portions: a header, a body, and a foot. The head and foot are rather similar to headers and footers in a word-processed document that remain the same for every page, while the body is the main content of the table.
The three elements for separating the head, body, and foot of a table are:
- – to create a separate table header.
- – to indicate the main body of the table.
- – to create a separate table footer.
A table may contain several elements to indicate different pages or groups of data. But it is notable that and tags should appear before
...more rows here containing four cells...

...more rows here containing four cells...
| ||||||||||||||||
This will produce following result:
| ||||||||||||||||||||||||
Nested Tables:
You can use one table inside another table. Not only tables you can use almost all the tags inside table data tag
.
.
Following is the example of using another table and other tags inside a table cell.
|
This will produce following result:
|
HTML Page Layouts
Web page layout is very important to give better look to your website. You should design your webpage layout very carefully.
You may have noticed that there are many websites which have put their content in multiple columns – they are formatted like a magazine or newspaper. This is easily achieved by using tables or division or span tags. Sometime you use CSS as well to position various elements or to create backgrounds or colorful look for the pages.
HTML Layout – Using Tables:
The simplest and most popular way of creating layouts is using HTML
tag. These tables are arranged in columns and rows, so you can utilize these rows and columns in whatever way you like.
tag. These tables are arranged in columns and rows, so you can utilize these rows and columns in whatever way you like.
For example, the following HTML layout example is achieved using a table with 3 rows and 2 columns – but the header and footer column spans both columns using the colspan attribute:
| ||||||
This will produce following result:
This is Web Page Main title | |
Main Menu
HTML PHP PERL… |
Technical and Managerial Tutorials
|
Copyright © 2007 Mytoptutorials.com
| |
Multiuple Columns Layouts – Using Tables
You can design your webpage to put your web content in multiple pages. You can keep your content in middle column and you can use left column to use menu and right column can be used to put advertisement or some other stuff. It will be very similar to our site mytoptutorials.com.
Here is an example to create three column layout:
|
This will produce following result:
Main Menu
HTML PHP PERL… |
Technical and Managerial Tutorials
|
Right Menu
HTML PHP PERL… |
HTML Layouts – Using DIV, SPAN
The div element is a block level element used for grouping HTML elements. While the div tag is a block-level element, the HTML span element is used for grouping elements at an inline level.
Although we can achieve pretty nice layouts with HTML tables, tables weren't really designed as a layout tool. Tables are more suited to presenting tabular data.
You can achieve same result whatever you have achieved using
tag in previous example.
tag in previous example.
This is Web Page Main title Main Menu HTML PHP PERL… Technical and Managerial Tutorials Copyright © 2007 Mytoptutorials.com |
HTML Embed Multimedia
You can add music or video into your web page. The easiest way to add videoorsoundtoyourwebsiteistoincludethe special HTML tag called This tag causes the browser itself to include controls for the multimedia automatically. You do not need to haveanyActiveX,JavaVM,VBscript or JavaScript to support this tag.
t's also a good idea to include the tag to support browsers which don't recognize the <embed> tag. You could, for example, use <embed> to display a movie of your choice, and <noembed> to display a single JPG image.</p>
<p style="border: 0px none; font-family: inherit; font-style: inherit; margin-bottom: 10px; padding: 0px; vertical-align: baseline;">
Here is a simple example to play embed a midi file:</p>
<table cellpadding="5" style="border: 1px solid black; font-family: inherit; font-size: 13px; font-style: inherit; margin: 0px 0px 1.4em; padding: 0px; vertical-align: middle; border-spacing: 0px; width: 566px; background-color: rgb(241, 241, 241);"><tbody style="border: 0px none; font-family: inherit; font-style: inherit; margin: 0px; padding: 0px; vertical-align: baseline;">
<tr style="border: 0px none; font-family: inherit; font-style: inherit; margin: 0px; padding: 0px; vertical-align: baseline;"><td style="border: 1px solid black; font-family: inherit; font-style: inherit; margin: 0px; padding: 4px 10px 4px 5px; vertical-align: middle;"><pre style="border: 0px none; font-family: 'andale mono', 'lucida console', monospace; font-size: 1em; margin-top: 1.5em; margin-bottom: 1.5em; padding: 0px; vertical-align: baseline; line-height: 1.5; overflow: auto; width: 460px;"><embed src="/html/sound.mp3" width="100%" height="60" >
<noembed><img src="yourimage.gif">
Attributes:Following is the list of important attributes for element.
- align – Determines how to align the object. It takes either center, left or right.
- autostart – Indicates if the media should start automatically. Netscape default is true, Internet Explorer is false.
- loop – Specifies if the sound should be played continuously (set loop to true), a certain number of times (a positive value) or not at all (false). This is supported by Netscape only.
- playcount – Specifies the number of times to play the sound. This is alternat option forloop if you are usiong IE.
- hidden – Defines if the object shows on the page. A false value means no and true means yes.
- height – Height of the object in pixels or en.
- width – Width of the object in pixels or en.
- pluginspage – Specifies the URL to get the plugin software.
- name – A name used to reference the object.
- src – URL of the object to be embedded. This can be any recognizable by the user's browser. It could be .mid, .wav, .mp3, .avi and so on).
- volume – Controls volume of the sound. Can be from 0 (off) to 100 (full volume). This attribute is supported by Netscape only.
HTML – Video Media Types
Flash movies (.swf), AVI's (.avi), and MOV's (.mov) file types are supported by the embed tag.
- .swf files – are the file types created by Macromedia's Flash program.
- .wmv files – are Microsoft's Window's Media Video file types.
- .mov files – are Apple's Quick Time Movie format.
- .mpeg files – are movie files created by the Moving Pictures Expert Group.
Background Audio – The Element:
You can use the tag to play a soundtrack in the background. This tag is for Internet Explorer documents only. Other browsers ignore the tag. It downloads and plays an audio file when the host document is first downloaded by the user and displayed. The background sound file also will replay whenever the user refreshes the browser display.
This tag is having only two attributes loop and src. Both these attributes have same meaning as explained above.
This will produce blank screen. This tag does not display any component and remains hidden.
Currently, Internet Explorer can handle three different sound format files: wav, the native format for PCs; au, the native format for most Unix workstations; and MIDI, a universal music-encoding scheme.
HTML Object tag:
HTML 4 introduces the
Here are few example:
You can embed a HTML document in an HTML document itself as follows:
Here alt attribute will come into picture if browser does not support object tag.
You can embed a PDF document in an HTML document as follows:
You can specify some parameters related to the document with the param tag. IE sometimes needs a src parameter to understand the location. Here is an exmaple to embed a wav file:
You can add a flash document as follows:
 |
You can add a java applet into HTML document as follows:
The classid attribute identifies which version of Java Plug-in to use. You can use the optionalcodebase attribute to specify if and how to download the JRE.
For a complete list of attributes of this object please check HTML Object Tag.
Referencing Audio, Video, and Images:
You can reference any external document, regardless of type or format, via a conventional anchor tag:
Here is an example to reference an audio file. Similar way you can refer any world document, PDF file, zip file etc.
| If you want to listen music then Click Here |
This will produce following result:
If you want to listen music then Click Here |
Just like any referenced document, the server delivers the desired multimedia object to the browser when the user selects the link. If the browser finds that the document is not HTML or XHTML but rather some other format, it automatically invokes an appropriate rendering tool to display or otherwise convey the contents of the object to the user.
Browsers identify and specially handle multimedia files from one of two different hints: either from the file's Multipurpose Internet Mail Extension (MIME) type, provided by the server, or from a special suffix in the file's name. The browser prefers MIME because of its richer description of the file and its contents, but it will infer the file's contents (type and format) from the file suffix: .gif or .jpg, for GIF and JPEG encoded images, for example, or .au for a special sound file.
No comments:
Post a Comment